- SEOPress Plugin Overview
- Do Previous Yoast Settings, Post and Meta Data Migrate?
- Prepare / Export Optimal Settings for Most Sites
- Configure All Subsites
- De-Activate Yoast
WordPress on its own does not do a great job at managing SEO. Historically, we supported Yoast (free version) plugin as the primary search engine optimization tool. Monster Insights had also been available and used by some campus sites. We hope to phase out (de-activate and ultimately delete) both Monster and Yoast during the 2023 calendar year as campuses upgrade to using the Gutenberg block editor and other new features.
SEOPress Plugin Overview
SEOPress is the recommended SEO plugin moving forward. UMS:IT has sponsored the purchase of the PRO version of the plugin and no cost to the campus is associated with its adoption. Below is an article that explains why migrating from Yoast to SEOPress is a wise choice at this point. We have experienced many of the same issues / frustrations with Yoast they expressed…: “Why You should Switch from Yoast to SEOPress”.
Web Technologies team can activate the SEOPress plugins for you when you are ready to initiate the transition. We recommend conducting the Yoast >> SEOPress transition during a “content freeze” window where your production site and data is pushed to your TEST system where everything can be activated, configured, migrated, and verified before going LIVE with the new SEO tooling in production. Otherwise, transitioning to SEOPress in production should be conducted carefully, since having two SEO tools in play simultaneously may cause confusion for site editors and admins, not to mention potential for miscounting traffic with multiple SEO tools tracking your site.
We highly recommend spending time with a recent tutorial (or several) on using and configuring SEOPress:
Let’s get started.
Do Previous Yoast Settings, Post and Meta Data Migrate?
Yes, they do. Keep Yoast activated during the transition to SEOPress. After SEOPress has been activated, navigate to a typical sub-site where you want to begin setting up SEOPress and navigate to:
SEO > Tools > Plugins > Select “Yoast SEO” > Migrate now.
It may take a few moments to complete the import. Wait until it says “Migration Complete.”
Prepare / Export Optimal Settings for Most Sites
It’s worth it to take the time to get to know all the SEOPress settings and options. They can be easily copied to all of your sub-sites. In order to prepare the best settings for most sites, choose a typical (sub-)site to configure and test all of your commonly-applicable SEOPress site settings.
Now, if desired, import your previous Yoast data as described above (SEO > Tools > Plugins > Select “Yoast SEO” > Migrate now).
Next, let’s review some settings we recommend evaluating carefully:
- Dashboard – Under “SEO Management,” assure only desired components are enabled. Disable all others. We have removed some of the options from the UI, here.
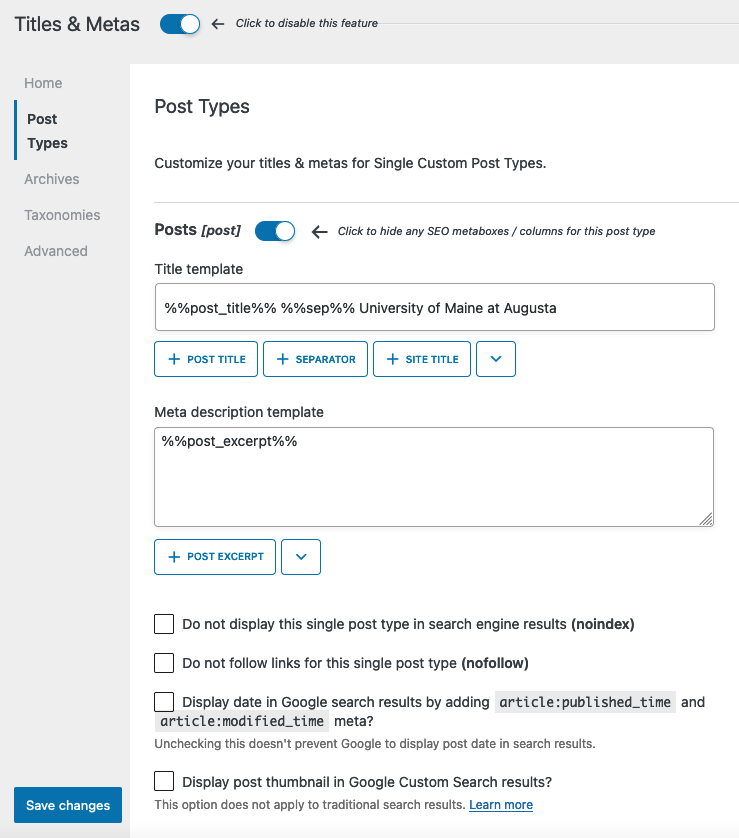
- Titles and Metas – You likely want this enabled. Decide on…:
- Configure your titles, set separators (e.g.: -), etc. for Home
- Configure your titles, set separators (e.g.: ), no-index, no-follow settings for Post Types. You’ll likely want to utilize Pages, (and Posts?) at least…
- Configure your titles, no-index, no-follow settings for Archives.
- Configure your titles, no-index, no-follow settings for Taxonomies.
- XML / HTML Sitemaps – You’ll likely want to Enable XML Sitemap; General tab >> Enable XML Site Maps.
- XML / HTML Sitemaps: Post Types tab – likely want to check both Posts / Pages
- Social Networks – Decide on enabling and configuring this, if the information is known and will be the same across most sites.
- Analytics, Instant Indexing – Set up your Analytics / tracking connections, here.
- Advanced > Image SEO & Advanced settings – Likely enabled. Configure Image SEO, Appearance, and many Security sub-settings, here that greatly affect what users will see.
- PRO – Breadcrumbs must be configured here in a sub-tab. Additional Google and 3rd-party service settings…
As you make changes, you can re-load and evaluate your pages / posts dashboard listing view changes, the post editing screen changes, and other points of validation.
When you have completed testing all of your SEOPress settings and configurations, export the settings.json file with:
SEO > Tools > Settings > Export to save the JSON settings file. We’ll need this file later.
Configure All Subsites
Now, in each site, do the following steps…:
Import the Yoast post and meta data.
Import the saved JSON settings file.
If you only have 1-2 sites with Posts enabled, you may want to set additional settings in those sites. Other sites with custom post types (e.g. Announcements, Academic Programs, Events, etc) may need additional settings, as well.
Fix the “Home Page Title” if using breadcrumbs…
Other tasks to consider:
Remove any Analytics tracking codes you may have in the Theme > Header / Footer Scripts area, once you have the SEOPress GA/4 connections established.
De-Activate Yoast
When the site-site migrations are complete, request Yoast to be de-activated network-wide.