- Overview
- Who Will Do What?
- Prepare your Request for the Scholarships Feature
- Determine and Configure Scholarship Settings
- Activate the Plugins (WEBTECH)
- Populate the Taxonomies
- Adding Scholarships
- Configure Search and Filter
- Assign the Display Template(s)
- Add the Scholarships Form to a Page
Overview
Enables user-driven search and filtering for campus-based scholarships. Detail pages for each scholarship are linked from search results. Various templates exist for displaying search results from simple list or table to a more customized presentation to mesh with the brand and colors of the campus style sheet.
Only super admin can enable and configure several aspects of this feature. It’s best to approach the implementation of this feature as a collaborative effort between the campus web team and Web Technologies team.
Who Will Do What?
- Web Technologies will install the plugins and assist with initial configurations and setups.
- Campus Admins can adjust the UMS Scholarships settings, fields, labels, descriptions.
- Editors & Admins can create, edit, and meta tag scholarships.
Prepare your Request for the Scholarships Feature
- First, you must identify or request creation of the sub-site where the (primary) Scholarships Listings will reside – e.g.: https://umf.maine.edu/scholarships/.
- Meet with Web Technologies to plan the settings and display of Scholarships feature.
- Work with your primary campus Web Site Administrator to submit your request to webtech.support@maine.edu
- Web Technologies team will activate the feature and configure your desired options / fields to expose.
Determine and Configure Scholarship Settings
After your Scholarships site has been created and the plugins activated, decide on all the settings for this feature. Go to Dashboard > Settings > UMS Scholarships and configure everything there…:
- Prepare your configuration choices for various options:
- Which available taxonomies will you utilize? (aka ways to search for scholarships):
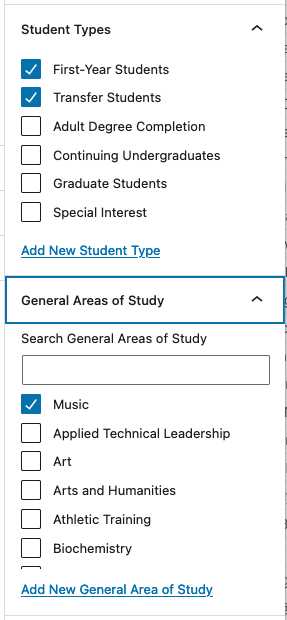
- Student Types
- Disclaimer text (appears at the bottom of each scholarship post)?
- Will you enable, set pop-up helper text, and / or require the following custom fields and labels?:
- Program Reference Code (an ID assigned to each scholarship)
- Merit Scholarship?
- Special Interest Scholarship?
- General Eligibility information
- Detailed Eligibility Requirements
- Award Amount
- Deadline
- How to Apply
- Application Link (URL)
- Application File (for Download)
- How to Renew
- Contacts Information and which contact details to expose (Name, Email, Phone, Title, Address, Profile Link)
- Which available taxonomies will you utilize? (aka ways to search for scholarships):
Activate the Plugins (WEBTECH)
All three of the following plugins must be activated to leverage the Scholarships feature:
- UMS Scholarships
- Search and Filter PRO
- UMS Template Manager
Populate the Taxonomies
We recommend Site Admins pre-populate the relevant taxonomies with appropriate terms. For example, you might add the following sample terms to draw students to specific kinds of scholarship opportunities:
- Student Types: 1st-Year, Transfer, Graduate, Continuing Undergraduate, etc
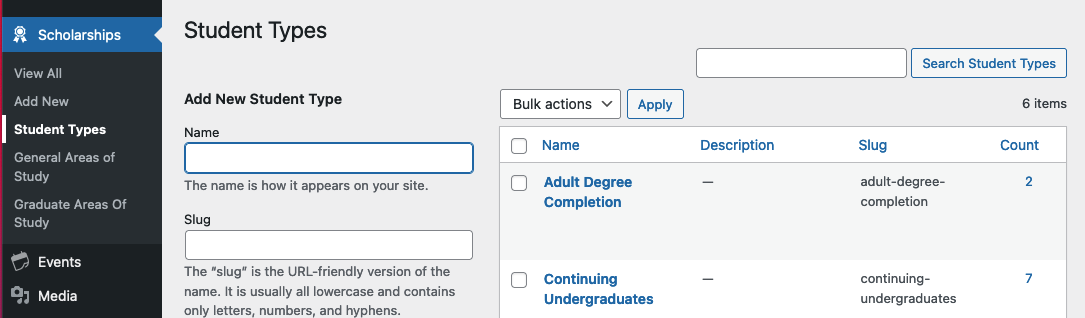
In the Dashboard, choose Scholarships > Student Types to enter the Student Types or Areas of Study. Add the name and a corresponding ‘slug’ for each.
Adding Scholarships
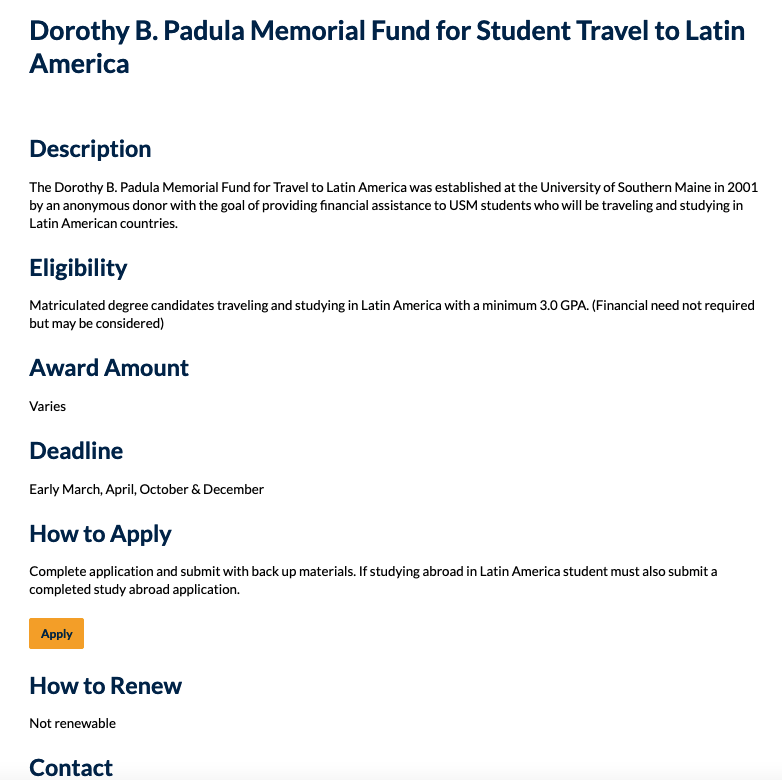
Now you can add several scholarships to assist in the creation and testing of the search form. Go to: Scholarships > Add New. Add the scholarship title and any introductory content you’d like to appear at the top of the scholarship detail page.
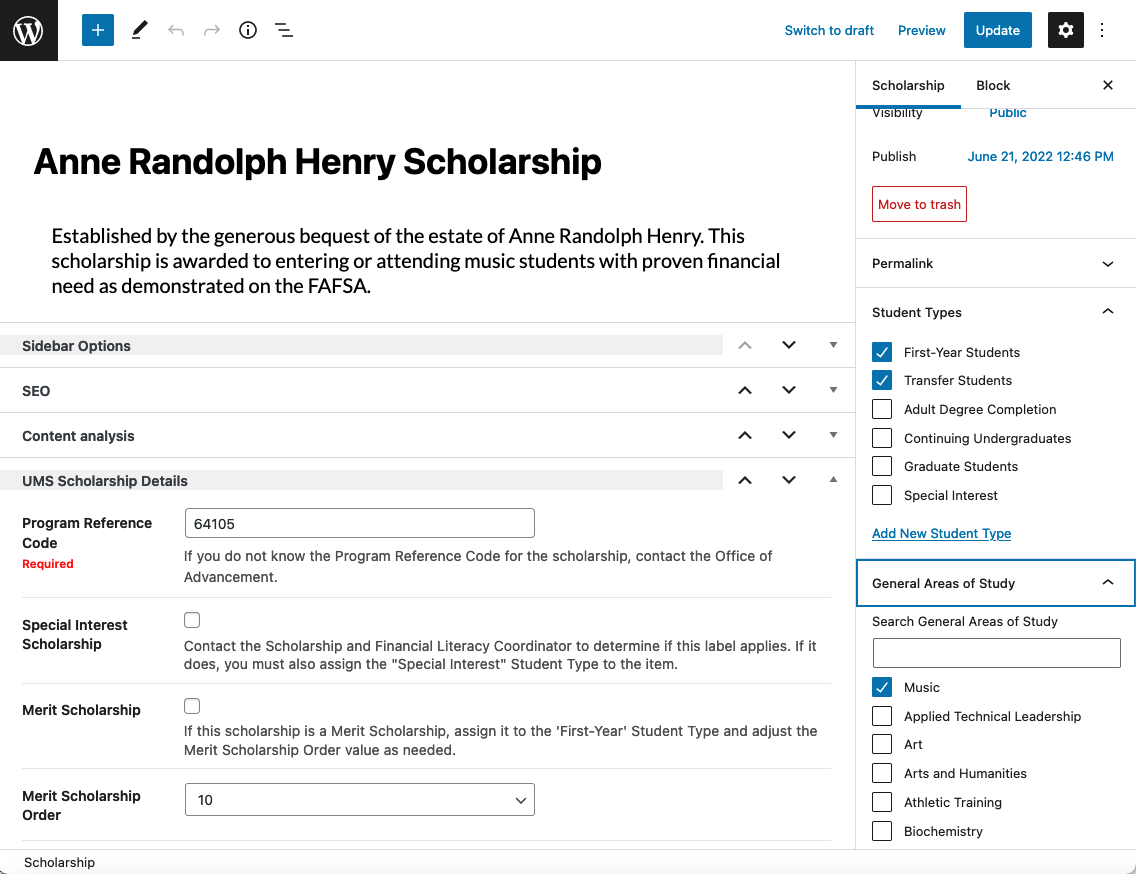
Expand the”UMS Scholarship Details” panel below the editing canvas. Complete all the sections required. Also note the expandable meta tag panels on the right side for easily assigning Student Types or Areas of Study with checkboxes. By pre-populating the taxonomy terms, you can train Editor users to only select existing terms and not add their own additional ones with the “Add New…” options below the listings.:
Configure Search and Filter
Once the taxonomies have been enabled, prepare a Search and Filter form to be displayed on a page. In the Dashboard, choose: Search and Filter > Add New Search Form. Complete these steps in cooperation with Web Technologies. Once configured correctly, it’s best to “set it and forget it.”
Settings and Defaults Section:
- General tab – Select the Scholarships Post Type. Decide on AND / OR operand. For results: 0 = all results.
- Display Results tab – Select Shortcode and decide on any AJAX options, Set the ‘template’ display page URL e.g.: https://uma.edu/scholarships/
- Posts (and other tabs) – Offer ways to further narrow the scholarships that display in the results set.
Form Section (Available Fields, Search Form UI):
- Drag the taxonomy and form fields you want to display to the user to the Search Form UI section.
- Specify exactly which taxonomy will be used and how the form field will appear and behave.

Once you save this form and settings you will have a shortcode that can be placed in a “Scholarships” page in your site.

Assign the Display Template(s)
Each Scholarships Search and Filter display needs to have a display template assigned. Complete these steps in cooperation with Web Technologies. Once configured correctly, it’s best to “set it and forget it.”
In the Dashboard, go to Settings >> UMS Templates – assign the desired existing template to each Search / Filter Query.
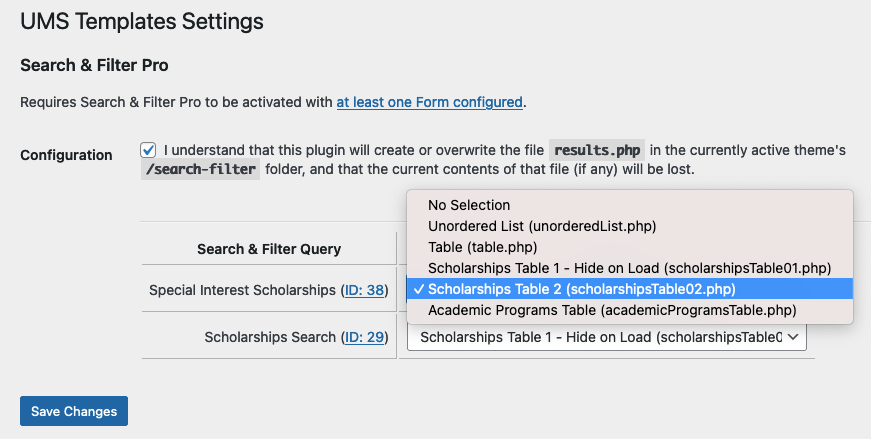
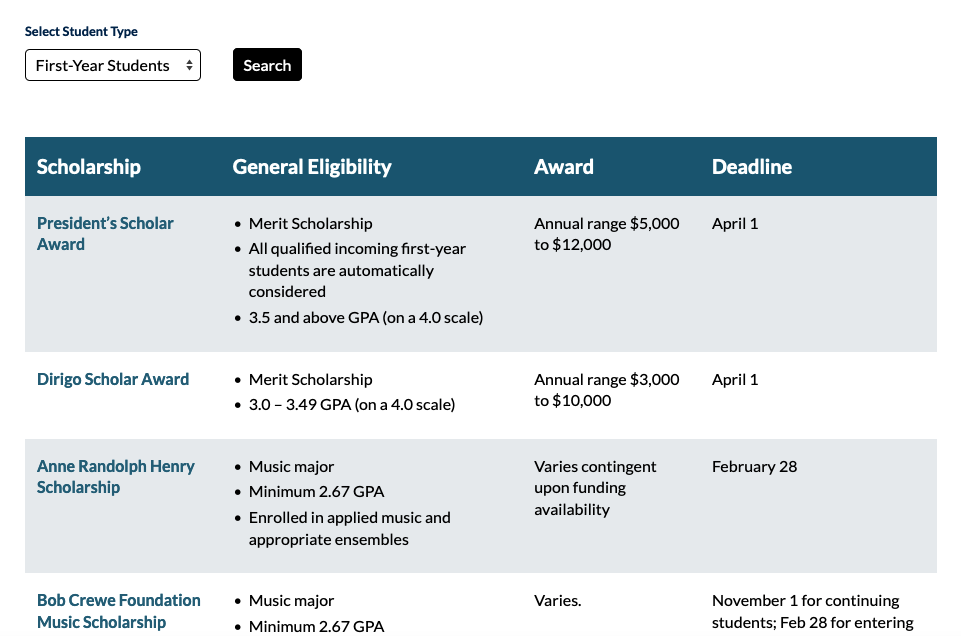
There are only a few display templates available at this time:
- Scholarships Table 1 – A styled table that is hidden on page load
- Scholarships Table 2 – A styled table
- Unordered List (simple display) is available
- Simple (unstyled) Table
Some colors may be tweaked via the campus style sheet.
Add the Scholarships Form to a Page
Use the Shortcode block to add a form and / or the results to a page:
- Form: [searchandfilter id=”632″]
- Results: [searchandfilter id=”632″ show=”results”]